

How To Connect Canon Camera To Computer
Getting started
To connect the camera to the calculator using the Wi-Fi part, confirm that the computer is connected to an access betoken (Wi-Fi router).
Step one: Preparing necessary items
one. Bank check the reckoner`s requirements.For the figurer environments supporting Wi-Fi connectedness function, refer to the Related Information section at the finish of the page.
IMPORTANT
- Windows 7 Starter and Home Bones editions are not supported.
- Windows vii N (European version) and KN (South Korean version) require a split up download and install of Windows Media Characteristic Pack.
2. Confirm that an access point base unit of measurement (wireless LAN router, etc.) is connected to the estimator.
iii. Make sure that the included CameraWindow* software is installed.
*The software is bachelor for download from the Catechism website.
Notation
- A router is a device that creates a network (LAN) construction for connecting multiple computers. A router that contains an internal wireless function is called a wireless (LAN) router.
- This page volition refer to all wireless routers and base stations equally "access points".
- When unsure of your reckoner setup, refer to the user manual provided with the figurer.
Even if your figurer is connected to an access indicate, sending images from the photographic camera to the reckoner requires irresolute the computer`s settings. The procedure is explained beneath.
Windows 7 users, go on to 2A: Windows seven
- 2A: Windows 7
2A-one. Click [Command Panel] from the Start carte du jour.
2A-two. Click [Network and Cyberspace].

2A-3. Click [Network and Sharing Center].

2A-iv. Click [Change avant-garde sharing settings].

2A-5. Click the electric current profile for [Choose media streaming options...].

2A-half-dozen. Click [Plow on media streaming].

NOTE
- If media streaming is already active, proceed to 7.
2A-seven. Click [OK].

2A-8. Click the current contour for [Turn on network discovery].

2A-9. Click [Save changes].

2A-10. Click [Control Panel Home].

2A-eleven. Click [System and Security].

2A-12. Click [Windows Firewall].

2A-13. Click [Avant-garde settings].

2A-xiv. Click [Inbound Rules].

2A-fifteen.  Choose [File and Printer Sharing] items ending in [ICMPv4], and then click
  [Enable Rule] on the right side of the window.

NOTE
If [Disable Rule] is displayed, the item is already enabled, and can exist left as is.
2A-16. Choose [Wireless Portable Devices (UPnP-In)], and so click [Enable Rule] on the right side of the window.

Note
- If [Disable Rule] is displayed, the detail is already enabled, and tin be left equally is.
2A-17. Close the [Windows Firewall with Advanced Security] window.

2A-18. Close the Control Panel window.
- 2B : Windows8
2B-one.  Move the pointer to the lesser right of the screen to display the Charms Bar, and then
 select [Settings].

2B-2. Click [Control Console].

2B-3. Click [Network and Internet].

2B-four. Click [Network and Sharing Center].

2B-5. Click [Modify avant-garde sharing settings].

2B-6. Click the electric current profile for [Choose media streaming options...].

2B-vii. Click [Turn on media streaming].

NOTE
- If media streaming is already active, proceed to viii.
2B-eight. Click [OK].

2B-9. Click the current profile for [Plow on network discovery].

2B-10. Click [Relieve changes].
2B-11. Click [Command Panel Dwelling house].

2B-12. Click [Organisation and Security].

2B-13. Click [Windows Firewall].

2B-14. Click [Advanced settings].

2B-15. Click [Inbound Rules].

2B-16.Choose [File and Printer Sharing] items catastrophe in [ICMPv4], and then click[Enable Dominion] on the right side of the window.

NOTE
- If [Disable Rule] is displayed, the particular is already enabled, and can be left as is.
2B-17.Choose [Wireless Portable Devices (UPnP-In)], and then click[Enable Rule] on the right side of the window.

Notation
- If [Disable Rule] is displayed, the item is already enabled, and can exist left every bit is.
2B-18. Close the [Windows Firewall with Advanced Security] window.

2B-19. Shut the Control Panel window.
Stride iii: Connecting the photographic camera to the computer
1. Press the <Playback> ( ) button on the photographic camera.
 two. Touch ( ).
).

Notation
When setting up a wireless LAN for the first time, the camera nickname registration screen will be displayed.

This nickname will be displayed on the screen of target devices when connecting to other devices via wireless LAN. Touch inside the frame and then enter a nickname (upward to sixteen letters and numbers) with the displayed keyboard.
iii. Bear on ( ).
).

four. Touch on [Add a Device].

Notation
One time a computer is added, the computer proper noun will be displayed on the screen in four. To connect to a calculator again, only cull the computer name from the listing.
5. A list of detected access points will be displayed in the [Access Bespeak Connect] screen.
Utilise the following method to connect with an access point.
5A-ane. Touch [WPS Connexion].

5A-two. Bear on [PBC Method].

5A-3. Button and hold the WPS connection push on the access point for a few seconds, and then touch on [Adjacent].

Annotation
A WPS connection push button is affixed to your access point (Wireless LAN, router, etc.). For further details on the location and how many seconds to press it, refer to the user guide included with your admission point.

5A-four. When a connectible device is establish, a screen like the ane below volition appear.
Impact the name of the computer y'all want to connect with.

5B-ane. The access point`southward encryption key is necessary for connexion. Refer to the user guide included with your access indicate to look upwards information on SSID, Network certificates and security keys.
NOTE
- An encryption primal (network key) is the key used when encrypting data during wireless transmission.
5B-ii. Touch an access point.

5B-3. Touch inside the frame and a keyboard will be displayed. Enter the encryption key and touch [Next].

5B-4. Bear upon [Car].

5B-5. A listing of devices connected to the access indicate volition announced on the screen. Touch the name of the reckoner you want to connect to.
A screen like the i beneath will appear.

5C-i. The access betoken`due south SSID, security method, and encryption fundamental are all necessary for connection. Refer to the user guide included with your access bespeak to look up data on SSID, Security method/encryption method, and security keys.
NOTE
- SSID-Numbers and letters used to identify a specific existing access bespeak. This is besides called the "access point name" or "network name".
- Security method/encryption method is the method for encrypting data during wireless transmission.
- Encryption key (network key) is the cardinal used when encrypting information during wireless transmission.
5C-2. Affect [Manual Settings].

5C-3. Touch on inside the frame and a keyboard volition be displayed. Enter the SSID key and bear upon [Next].

5C-iv. Select the Security method/encryption method.

5C-5. Affect inside the frame and a keyboard will exist displayed. Enter the encryption key and bear upon [Next].
5C-6. Affect [Auto].
5C-7. Touch on the proper name of the computer you want to connect to.
A screen like the following volition appear.
When wirelessly connecting the camera to a computer for the first time, it is necessary to install the drivers using the following procedure (Windows Only).
7A-1. Windows 7
When the screen in footstep 7 is shown on the camera'southward LCD panel, click the calculator's Showtime carte and choose [Control Console] > [Network and Net] > [View network computers and devices], and then cull the continued camera from [Other Devices] and then double click the camera icon. Driver installation volition brainstorm.

7A-2. After driver installation is consummate, and the camera and figurer connexion is enabled, the AutoPlay screen will be displayed.
Cipher will be displayed on the camera screen.
Click [Download Images From Canon Camera].

7B-1. Windows 8
When the screen in footstep 7 is shown on the camera's LCD panel, move the computer'south pointer to the bottom right side of the desktop to display the Charms Bar, and and then click [Settings] > [Control Panel] > [Add a Device].

7B-2. The camera'southward icon volition exist displayed in the [Add together a device] screen.
Double-click the icon to begin driver installation.

7B-3. When the connection between the camera and the computer has been established, a screen like the following will appear.
Click [Tap to choose what happens with this device.]
Zilch will be displayed on the camera's LCD panel.

7B-4. Click [Downloads images from Canon photographic camera].

Step iv: Sending images to the calculator
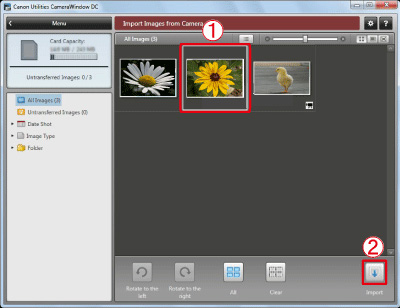
i. The CameraWindow bill of fare window will be displayed, and then click [Import Images from Camera].
ii. A window like the one shown below volition appear, so click [Import Untransferred Images], [Select Images to Import], or  [Import All Images].

3. If you chose [Select Images to Import] in Step two, Select the images you want to import, and so click [Import] ( ).
).
4. The following window volition announced, and the figurer will start to transfer images from the camera.
5. Click [OK].

Notation
- Click the (
 ) button to shut this window. A related application ([ImageBrowser EX] by default) volition showtime automatically and the imported images are displayed.
 - CameraWindow default settings will save images to the Pictures or My Pictures folders on a computer.
- Movies will take longer to import since the file size is larger than nevertheless images.
- To disconnect from the camera, turn off the camera.

Source: https://www.canon.co.uk/support/consumer_products/content/faq/?itemid=tcm%3A14-1024966
Posted by: comesbeamer.blogspot.com
0 Response to "How To Connect Canon Camera To Computer"
Post a Comment